What’s the fastest way to make digital productions feel warm, cohesive, and expensive without stacking saturation plugins that sound obviously processed? Tape emulation plugins – they recreate the magnetic saturation, transient softening, and harmonic glue that made classic records sound finished before digital perfection became the default.
With that said, here are the best tape plugins I recommend for producers and mix engineers who need analog warmth, natural compression, and that “recorded to tape” cohesion without the maintenance headaches, calibration nightmares, or $20,000 price tag of real tape machines.
This guide covers tape plugins from Arturia Tape J-37, Softube Tape, Universal Audio Studer A800, Baby Audio TAIP, Waves J37 Tape, Universal Audio Ampex ATR 102, Caelum Audio Tape Pro, and u-he Satin, plus three capable free alternatives that deliver authentic tape behavior without the price tag.
Standard saturation plugins add harmonics but miss the complex magnetic behavior, frequency-dependent compression, and subtle mechanical instability that made tape the final quality filter on professional records for decades. On the flip side, real tape machines shape sound through magnetic hysteresis that created natural compression, bias circuits that controlled saturation onset and high-frequency response, speed-dependent head bump that adds low-end weight, and wow/flutter.
But now let’s talk about the actual plugins:
1. Arturia Tape J-37
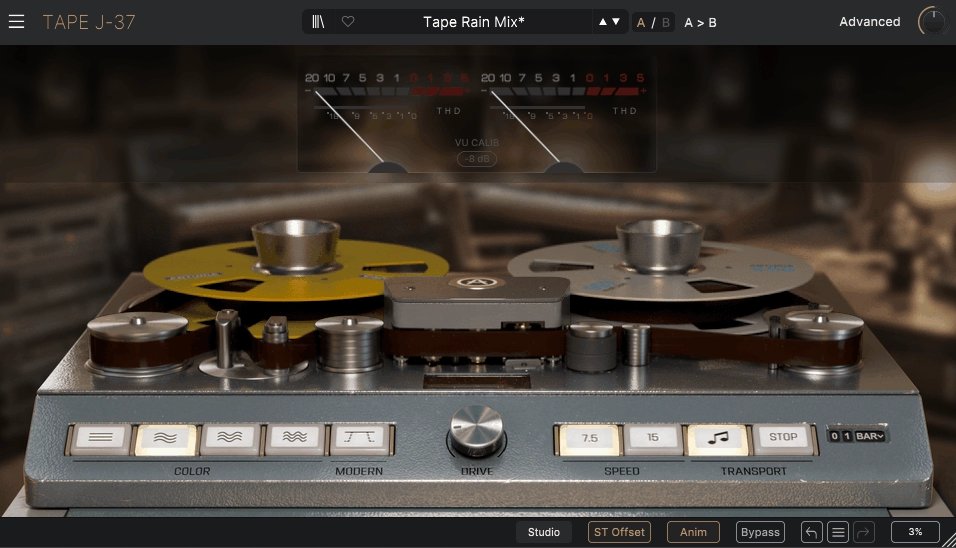
Arturia Tape J-37 recreates the Studer J37 reel-to-reel tape machine using neural-based modeling that captures magnetic behavior and nonlinearities rather than just adding saturation. You’re getting believable analog character that reacts like actual tape, and the four tape color modes based on different tape formulas give you control from clean tape sheen to rich driven saturation.
I find the auto-gain compensation particularly useful because it lets you drive the tape stage harder without fooling yourself with loudness increases, so you’re hearing actual tonal change. The speed control between 7.5 IPS and 15 IPS makes a real difference where 7.5 IPS gives you warmer, darker response with rolled-off highs, while 15 IPS keeps broader frequency content for modern punch.
- Neural-Based Magnetic Modeling
When it comes to modeling framework, it captures subtle magnetic behavior and nonlinearities rather than just harmonic distortion, which means you’re getting the timbre of analog tape recording with believable, controllable results. I like how this approach injects grit and harmonic girth while still allowing precise tonal decisions, and the color options present audibly distinct flavors that you can shape based on what the mix needs.
You can push the saturation hard on drum buses where you want pronounced analog thickness, or keep it subtle on the full mix when you just need cohesion without obvious tape artifacts. I feel the effect on low end is compelling because it doesn’t just add weight but actually changes how the bottom end sits in the mix, giving it that finished record feel.
- Four Tape Color Modes Plus Modern Option
Each color mode is based on different tape formulas that give you everything from clean subtle tape sheen to rich driven saturation, making it useful on individual stems just as much as submixes or masters. I find the Modern Mode preserves clarity while still injecting analog warmth, which becomes essential when you’re working on material that needs tape character but can’t afford the frequency loss of vintage formulas.
You can switch between colors depending on whether you need transparent enhancement or more aggressive saturation, and the tonal difference between modes is audible enough that it actually matters for mix decisions rather than being subtle variations of the same thing. When I’m trying to add cohesion to a mix bus, the color options prevent overly harsh buildup while the saturation subtly ties tracks together.
- Integrated Instability and Mechanical Movement
The wow and flutter instability feels more integrated than typical tape plugins because it interacts with the saturation and stereo behavior organically, giving you slight phasing and movement that makes static mixes feel alive. This isn’t classic modulated effects like chorus, it’s the natural mechanical variation of tape machines that adds depth without sounding processed.
I like how the play/stop tape effects simulate actual tape spool physics, letting you create tape stop and start transitions that feel like you’re physically touching the reel. You can automate these for creative breaks without needing separate processing, which saves you from building complicated effect chains just to get one transition right.
- Stereo Offset
Here, the stereo offset simulates natural channel dispersion of tape machines, affecting stereo width and micro-timing in a way that adds depth without artificial widening that sounds fake. Behind the advanced panel you get control over tape noise, built-in delay, and a flexible EQ section that aren’t superficial add-ons but actually shape how the tape effect sits in your mix.
I find the built-in EQ helps you address problem regions before the tape stage colors them, which saves you from fighting frequency buildups later. The VU meters showing input and THD give you real-time feedback so you know exactly how hard you’re driving the tape stage, and the delay section can add subtle timing variations that enhance the mechanical character without turning into obvious echo.
2. Softube Tape
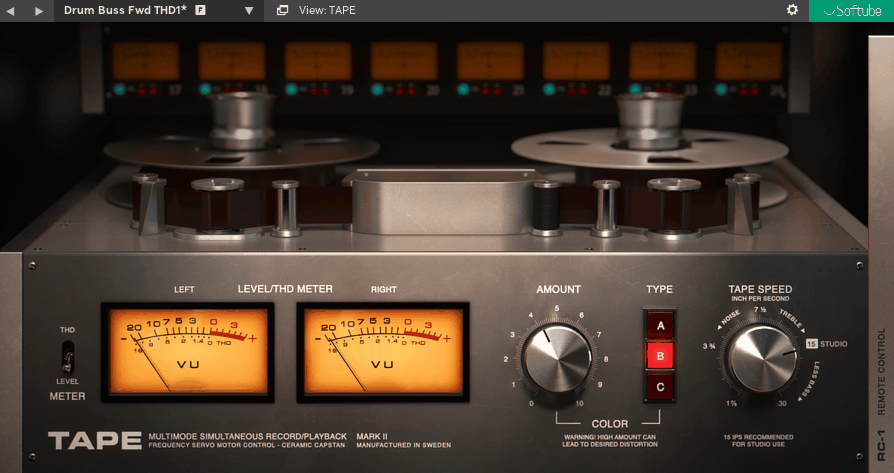
Softube Tape is built for one job which is adding cohesion, weight, and controlled softening without turning your session into a calibration project. The front panel is intentionally minimal, but under the hood you’re getting component level and physical modeling of three distinct tape machines plus the controls that actually matter when you’re using tape as a mixing tool rather than a vibe gimmick.
I find the three machine types are the real feature here because Softube doesn’t give you one tape sound with different formulas but three distinct machine types with different tonal centers and behavior. Type A is the cleaner, more linear option based on a classic Swiss high end reel to reel, and it’s what you reach for when you want tape glue and transient rounding while keeping the mix shape intact.
- Three Distinct Machine Types
Type A is the cleaner, more linear option based on a Swiss high end reel to reel style machine, and it’s what you reach for when you want tape glue and transient rounding while keeping the mix shape intact. Type B is explicitly more colorful, inspired by a transformer based circuit with extra weight and low end cream, which makes Tape a serious bus processor for drums, bass groups, or dense mixes that need thickness without obvious EQ.
Type C is the more vibey, vintage leaning British machine inspiration that tends to be the character glue option when you want a slightly more obvious imprint that still reads like tape instead of distortion. I like how each Type gives you genuinely different behavior rather than subtle variations of the same thing, so you’re actually making a tonal decision when you choose the machine.
- Tape Speed as a Real Mix Control
When it comes to 30 ips and 15 ips, they are the neutral, mastering grade settings that work well on the master bus, while 7.5 ips and below are for deliberately warmer, fatter tones.
Slower speeds also exaggerate the tape head bump behavior, which is why Tape can add low end weight in a way that feels like a medium, not an EQ boost.
- High Frequency Trim and Mastering Grade Controls
The High Frequency Trim is explicitly designed as a mastering grade high frequency compensation control with a Flat reference point where boost adds sheen and clarity while cut moves the sound toward warmer vintage roll off. This is what makes Tape practical on a master because you can let the tape stage do its smoothing, then compensate highs without stacking another EQ plugin unless you need surgical work.
Crosstalk models magnetic tape bleed between channels, and on a stereo mix it can subtly reinforce center elements and change perceived width in a way that feels like a real playback chain rather than stereo trickery. I like how the manual calls out typical mastering use with moderate crosstalk amounts, which tells you they expect it to live on a bus, not just individual tracks.
- Speed Stability for Movement or Chorus
Speed Stability is the wow and flutter control framed as tape wear from stable to wobbly, and combining stability with the dry wet control can produce chorusing, which is exactly what happens when you blend modulated and unmodulated versions. That means you can keep Tape clean and gluey, or deliberately use it as a widening or motion layer when the mix needs subtle movement.
The Run and Stop buttons emulate tape speed up and speed down behavior, and you can automate it to get tape start stop moments without reaching for a separate tape stop plugin, which becomes useful for transitions and production moments.
3. Waves J37 Tape
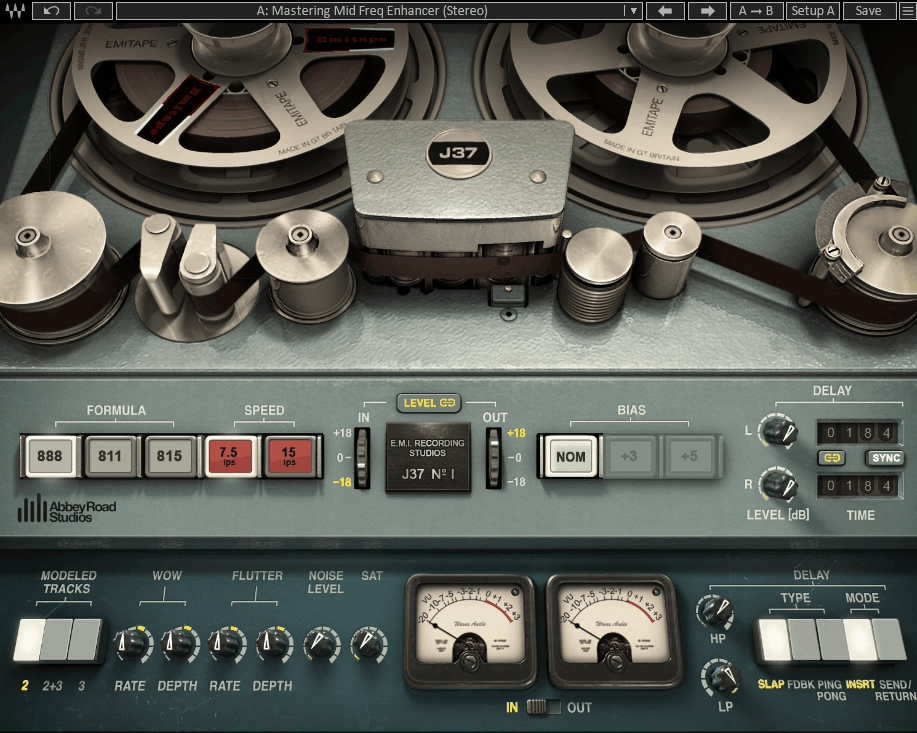
This character focused tape plugin is built around the Abbey Road Studios Studer J37, a valve driven four track machine associated with 60s and 70s recording workflows. The core appeal is that it behaves like a tape stage with the usual tape decisions exposed, but it also includes a properly integrated tape delay section. Waves J37 Tape can live as either a mix utility for cohesion or as a creative insert that becomes part of the arrangement.
I noticed that tape engine is not trying to be the most clinical mastering tape model but is built to add firmness, density, and presence quickly, which is the sweet spot when you want tape as a mix tool, especially on drums, guitars, vocals, and buses that need to feel more finished without obvious EQ moves. The flip side is that it can lean into a harder upper mid character if you push it without managing bias, speed, and saturation relationships where it can get quite hard in the upper midrange compared to other tape plugins, which is a real mixing note you should keep in mind.
- Three EMI Tape Formulas with Different Distortion Behavior
A defining feature is the three modeled EMI oxide formulations: EMI 888, EMI 811, and EMI 815 where these are exclusive tape formulas developed by EMI, each with its own frequency response and harmonic distortion behavior. In practical terms, 815 is the cleaner, higher quality direction, while 888 is the dirtier, lower quality direction, with 811 sitting between, and this is one of the reasons J37 is still useful even if you own other tape plugins.
Tape type selection here is not a subtle label change but a fast voicing decision that shifts both tone and how saturation blooms when you drive the input. I appreciate how you can switch between formulas depending on whether you need transparent glue or more pronounced character, and the tonal difference is audible enough that it actually matters for mix decisions.
- Speed and Bias as Core Mix Controls
J37 tape emulation plugin keeps the speed options focused at 7.5 ips and 15 ips where switching speeds changes noise and frequency response, with 15 ips giving increased high frequency response and shifting noise an octave higher than 7.5. In practice, 15 ips is the more open, mix bus friendly option when you want cohesion without too much dulling, while 7.5 ips is the warmer, thicker option that can exaggerate low end character and soften top end in a way that feels period correct on drums, bass, keys, and loops.
Bias control is not a token knob here where you get Nominal, +3 dB Over Bias, and +5 dB Over Bias options, and bias is one of the easiest ways to steer the harmonic texture and high frequency behavior without reaching for an EQ after the fact. If you’re hearing that upper mid hardness some reviewers mention, bias and speed choices are where you fix it before you start fighting it downstream.
- Integrated Tape Delay Section
One reason J37 holds up as a modern tool is the integrated tape delay section that recreates tape delay with three different delay types plus sync and filtering controls. This matters because it lets you commit to a tape based space without stacking a separate delay that doesn’t share the same saturation and noise context, and if you use J37 for production, this delay is often the difference between it being a tone plugin and it being a signature sound tool, especially on vocals, guitars, dubby synths, and drum fills.
- Saturation, Wow, Flutter, and Noise Control
One more thing I would want to mention is a main panel that covers the essentials where Saturation, Noise, Wow, and Flutter give you range from subtle on buses to audible instability and grit for production moves. The wow and flutter section is more than a single wobble knob where you get controls for both rate and depth, which makes it easier to keep movement believable rather than obviously LFO driven.
Noise is equally practical where you can use it as light glue that makes a resampled part feel sourced, or keep it off entirely when you’re using J37 purely for tone and transient rounding.
4. Baby Audio TAIP
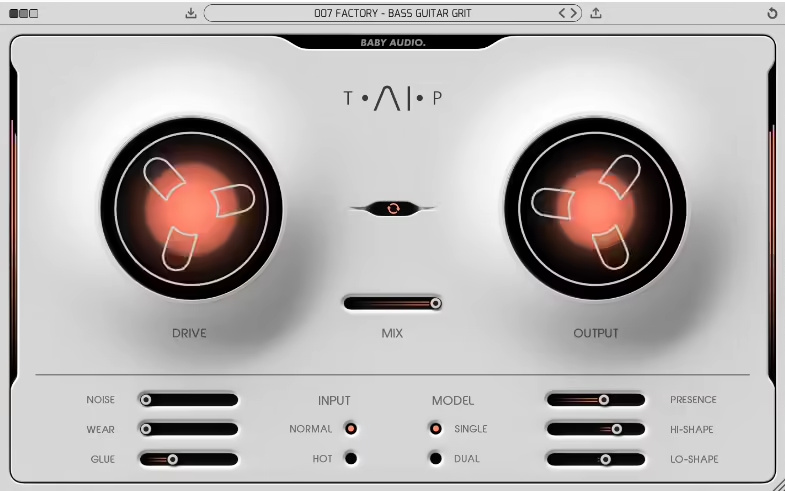
This tape plugin is built for modern mixing decisions, not for recreating a specific machine panel by panel where the core tape behavior is machine learned from a classic 1970s tape machine, and then split into controls you can combine in ways hardware simply doesn’t allow. Baby Audio TAIP is designed to get you there quickly if you want a tape insert that can do subtle glue on a bus, aggressive saturation on a source, or controlled lo fi wear in parallel.
I find what it sounds like in a mix is already doing something even before you start pushing it where with settings effectively at zero, it still adds subtle 2nd and 3rd harmonic distortion, which is why it can work as a low effort cohesion layer across multiple tracks.
Where it gets genuinely useful is that it doesn’t force me into the usual tape decisions like speed and tape formula but gives me controls that map directly to mix outcomes where I get saturation amount, perceived compression, top end loss or recovery, wear movement, and frequency targeted saturation.
- Drive, Input Modes, and Dual Processing
The main level control is Drive, and it’s meant to be pushed where you get everything from subtle heat to heavy distortion, and the plugin backs that up with a gain structure that’s easy to manage.
You also get Normal and Hot input modes, so you can hit the model harder without turning the output into a loudness trap, and Auto Gain lets you drive the tape harder while keeping output consistent, which matters when you’re deciding whether the tone is actually better or just louder.
The Model switch is not a cosmetic option where Single is the normal tape path while Dual chains two tape processes under the hood, each applying half the Drive value, which tends to increase weight and density while staying smoother than simply doubling Drive in one stage. I like how this is one of the easiest ways to make a mix bus feel thicker without instantly tipping into obvious distortion.
- Glue Control for Tape Style Compression
The Glue control is the reason this plugin often gets used as a bus tool instead of just another saturator where Glue is positioned as the compression like behavior caused by tape’s limited dynamic range, and you can exaggerate it into a compressor like effect. I find higher Glue settings work particularly well on transient heavy material like kicks and snares where you get added pop and thump, and in real mixing Glue is the knob that makes it feel like a cohesion device rather than a distortion box.
- Frequency Targeted Saturation with Lo Shape and Hi Shape
Lo Shape and Hi Shape let you saturate low and high frequencies more or less than the rest of the spectrum, which is a serious mixing feature because it lets you shape tape behavior in frequency terms, not just with EQ after the fact. I like how this lets you warm a drum bus without destroying the low end, or push edge and density in the top without turning the whole signal into fuzz.
Presence is the complementary control for tape’s top end behavior where it decides how much of that roll off you keep, essentially bringing brightness back when tape dullness is too much. This becomes particularly useful when you’ve pushed Drive and Glue hard but need to recover clarity without stacking another EQ plugin.
- Wear and Parallel Tape Flanging
Wear combines wow, flutter, and an altered frequency response curve to emulate a worn out deck, and the Mix control is where this becomes a very usable mixing tool because you can run it in parallel inside the plugin. I find a specific trick particularly useful where you combine Mix below 100% with Wear above 0 to get tape flanging because the worn modulation runs alongside the dry track, and that’s a practical way to add movement and thickness without reaching for a dedicated flanger.
Noise is straightforward where you can add tape noise or avoid it entirely, and the important part is that it’s integrated into the same workflow so you can choose whether you want tape tone only for modern mixes or the full medium context.
5. Universal Audio Studer A800
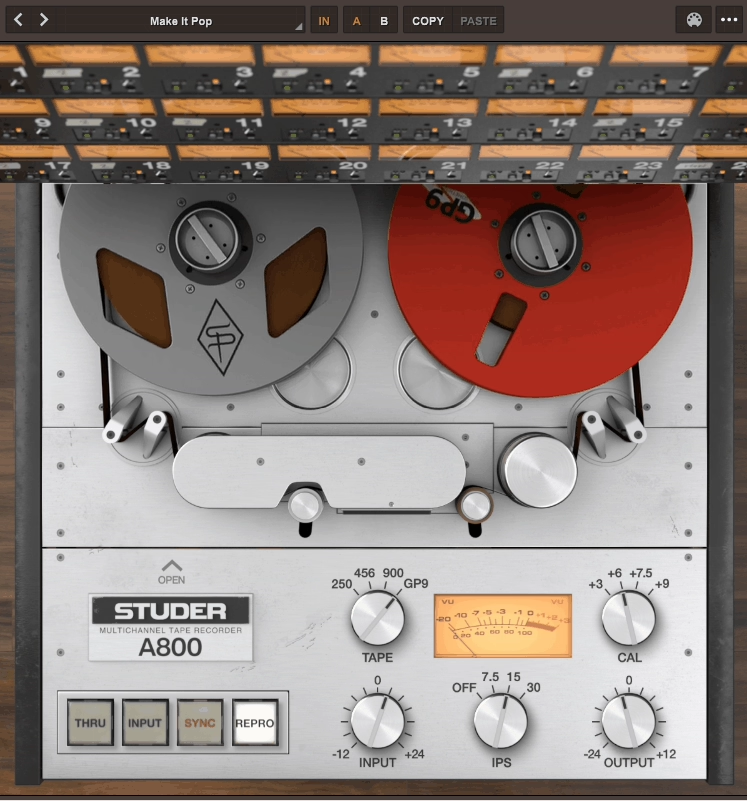
Universal Audio Studer A800 is the tape plugin I would reach for when I want the sound of tracking to 2 inch multitrack inside a DAW, not just tape warmth. The A800 is modeled as a full multichannel deck with the kinds of controls that actually matter in mixing where I get tape speed and emphasis curves, tape formula choices, calibration, bias, noise and hum, and the different monitor paths that define how a real machine behaves.
I found that what makes it different in real mixes is that it’s not designed as a sweetener for the stereo bus first but as a multitrack machine you can put across channels and groups so tape becomes part of your gain structure and transient control. A key detail that separates it from simpler tape plugins is that UA modeled the A800’s complete electronic signal paths, including Input, Sync, and Repro, which matters because the tone and transient behavior of a tape machine is not only tape but also where you’re monitoring and how the electronics are staged.
- Tape Speed and Emphasis Curves as Tonal Decisions
You get the classic speed choices, and UAD explicitly frames them as changing frequency shift, head bump, and distortion characteristics, which means speed selection is a tonal decision, a low end contour decision, and a distortion onset decision, not a checkbox. The emphasis curve options alongside speed affect HF response, and you’ll see curves like 7.5 NAB, 7.5 CCIR, 15 NAB, 15 CCIR, and 30 AES that let you brighten or darken the sound by changing the tape speed and curve behavior.
I like how this is the correct mindset where you’re choosing the record and playback framing, not EQing after the fact. On drums and bass, this head bump plus saturation onset interaction is exactly what tape does well, giving you transient rounding and density without making the bottom end feel artificially boosted.
- Four Tape Formulas and Calibration Control
Universal Audio gives you four tape formulas that behave like subtle tone profiles plus different saturation onset, which is why a lot of engineers treat tape type selection like a high level voicing choice before they touch EQ. This is where the A800 earns its reputation as a serious mix tool instead of a vibe box because you can get the recommended behavior quickly, but you’re not locked into it.
Auto Cal resets the secondary calibration controls to manufacturer recommended settings, so you can return to a sensible baseline fast. Then you can deliberately move away from that baseline with bias and HF and LF calibration per path, and this is the difference between tape coloration and tape as a system you can align.
Bias control is especially important on this plugin because it’s one of the most direct ways to change saturation onset and HF behavior without using EQ. I find that over biasing works as a deliberate tone shaping move, which is how real tape workflows treat it, and on vocals and guitars the A800 is often less about distortion and more about making midrange feel printed and controlled so later compression works less brutally.
- Gang Feature for Session Wide Control
Ganging lets you change key parameters across all instances at once, like you would on a real multitrack deck where a single machine setting affects every channel, and speed, tape formula, and calibration style changes are the classic global moves you want to apply across the session.
This is the big usability difference versus one tape plugin per track with no coordination because without ganging, you either stop using tape widely or you stop being consistent. With ganging, tape becomes part of your mix structure, and I think this is what makes the A800 convincing when it’s the multitrack stage while a dedicated two track deck style plugin handles final print.
- Noise, Hum, and Monitor Path Behavior
Lastly, UAD gives you hiss and hum controls that can be matched to hardware behavior, plus a global noise bypass when you want the tape tone without adding noise to a modern mix. I like how the noise in the A800 is a calibrated part of the deck behavior but still optional when you’re mixing for modern loudness and clarity, because noise in tape plugins is often either too polite or too obviously looped.
The different monitor paths change how the tape affects your sound where Input, Sync, and Repro each have different tonal and transient characteristics. That’s a real tape workflow where the tone isn’t just about the tape medium but about where you’re monitoring in the signal chain, and this level of control is what separates the A800 from simpler tape emulations that just give you one flavor.
6. Universal Audio Ampex ATR 102
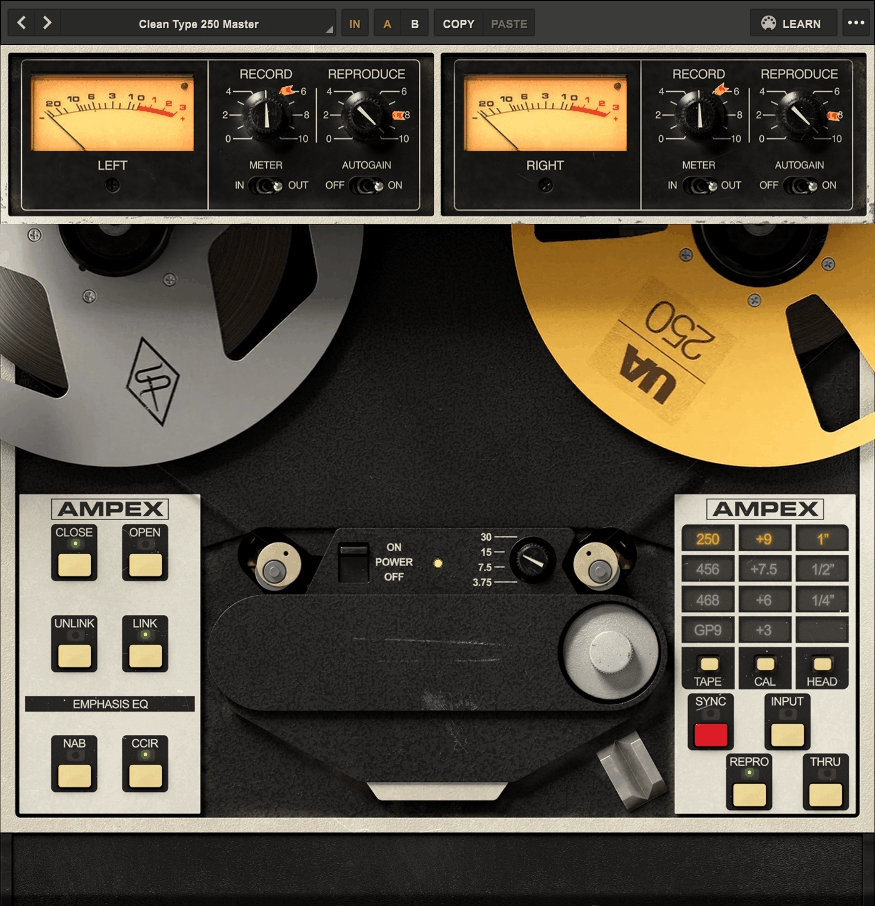
This is a mastering deck emulation, not a generic tape saturator, and it’s built around the idea that the ATR is the final two track stage that makes a mix feel like a record. Universal Audio Ampex ATR 102 tape emulation plugin gives you the real levers exposed where you get head width, tape speed, emphasis EQ, tape formula, calibration level, bias and alignment controls, crosstalk, wow flutter, hiss and hum, and a switchable transformer path. UA position it exactly as that last insert on the stereo bus, after your mix processing and before a final brickwall limiter if you use one.
From what I can see, the core workflow is choosing a mastering deck setup, then driving it like hardware where the fastest way to use ATR 102 is pick a head width, pick a speed and EQ standard, pick a tape formula, hit CAL or Auto Cal, then use Input Record level and repro/record trims to decide how much tape compression and saturation you want. UA explicitly calls out Auto Gain to keep gain staging stable while you adjust record or repro levels, which matters because tape decisions are easy to misjudge when loudness shifts.
- Head Width Changes How the Whole Curve Behaves
ATR 102 lets you select ¼ inch, ½ inch, or 1 inch head stacks where as track width increases you get audible improvements in stability, fidelity, and noise, and the 1 inch head option reflects a popular aftermarket mod for pushing the deck into very high fidelity territory. In practice, ¼ inch tends to feel more obviously tape, while ½ inch and especially 1 inch can be used for glue and depth without making the mix sound obviously processed.
I like how this choice affects the entire character of the plugin where it’s not just more fidelity but a different tonal relationship that changes how you approach the rest of the controls.
- Tape Speed and Emphasis EQ as Mastering Tone Decisions
UA models 3.75, 7.5, 15, and 30 IPS, and they explicitly describe each speed as having distinct frequency shift, head bump, and distortion behavior, with 3.75 IPS being deliberately lo fi. This is why ATR 102 can do both modern mastering polish and obvious vibe depending on speed where if you want the cleanest glue, 30 IPS is usually the move, while dropping to 15 or 7.5 makes the effect more obvious fast.
On top of speed, you can choose emphasis EQ standards including NAB, CCIR, and AES depending on the speed setting, which is part of why engineers treat this plugin as a mastering tone tool rather than a simple saturator. I find being able to swap NAB vs CCIR at 15 IPS is a real world mastering choice you cannot easily audition instantly on hardware, and this is where ATR 102 becomes genuinely useful for exploring tonal options quickly.
- Seven Tape Formulas and Calibration Levels
UA models seven tape formulas including common pro formulas like GP9, 456, 900, and 250, with availability depending on head width and speed, and this matters because tape isn’t one sound where different stocks change distortion onset, compression feel, and how the top end behaves as you drive level. Calibration levels effectively set how much level it takes before tape starts saturating for a given tape type, which is the mastering engineer angle where you can open headroom for cleaner glue, or push toward heavier tape compression without changing your mix balance.
The transformer switch is a legit tone option where UA models the ATR’s isolation transformers and lets you disable them, reflecting a common hardware modification path. That gives you two valid mastering personalities in one plugin where you get transformer color for thickness and harmonic density, or transformer bypass when you want tape behavior with less additional circuit imprint.
- Head Bump, Transient Smoothing, and Finished Record Cohesion
This plugin’s reputation is built on two very specific behaviors where you get head bump style low frequency weight and transient smoothing that makes the top end feel less brittle without feeling like you just EQ’d it down. I like how the plugin models hiss, hum, wow, flutter, and crosstalk as inherent parts of the machine, but you’re not forced into them where you can disable these when the client wants tape tone but cannot tolerate audible noise.
That flexibility is one of the big reasons ATR 102 stays useful in modern mastering where you may want the dynamics and harmonic behavior of tape without committing to the noise floor. When you hit it correctly, the result is not more saturation but a more cohesive picture where the mix feels like it went through a single physical stage.
7. Caelum Audio Tape Pro

Caelum Audio Tape Pro sits in a very specific lane where it’s a tape emulation that’s also a modular creative processor, with each major tape behavior split into its own section so I can build anything from subtle mix glue to exaggerated tape toybox effects without stacking multiple plugins.
It’s not trying to be a single sacred machine model with a fixed signal path but a multi FX tape suite where I choose the saturation behavior, choose the tape machine tone via impulse responses, then decide how much wow, flutter, delay, and noise I want to add.
I find the plugin is laid out as dedicated modules, and the structure matters because it makes the workflow predictable when you’re mixing fast where you get core sections for Saturation, Response, Noise, Wow and Flutter, and Delay. This layout is the main reason it works on both buses and individual tracks because you can treat it like a channel strip where tape tone and tape movement are separate decisions instead of one combined character knob.
- Saturation Module with Six Algorithms
Tape Pro starts with a Saturation module that includes six saturation algorithms including Tape, Digital, Rectify, Half Rectify, Sine, and Smooth, and Caelum explicitly ties this stage to tape behavior by including controls like hysteresis, asymmetry, and remanence. Those controls are the difference between generic distortion and tape like nonlinearity because they let me shape how saturation blooms, how it biases, and how it hangs on to signal over time.
From what I can tell, for mixing and mastering, this module is quite useful because you can keep it conservative and use it like a true tape stage that rounds peaks and adds density, or you can deliberately choose the less tape like shapes and use Tape Pro as a controlled distortion tool that still benefits from the downstream tape response and mechanics!
- Response Module with 21 Impulse Responses
The Response module is where Tape Pro separates itself from simpler tape plugins where instead of just offering tape types, it uses selectable impulse responses to model tape machine tone. You get 21 selectable impulse responses from 11 different tape machines plus minimum phase versions intended for parallel, bus, or send use, and this matters in practice because tape coloration often comes as much from the playback electronics and frequency shaping as it does from saturation.
I like how the IR approach lets you dial the overall spectral contour quickly, then decide how hard you want to drive the saturation stage into it. It also makes Tape Pro unusually easy to use in parallel because minimum phase IR options help avoid the phasey mess you can get when blending an IR processed path back with dry.
- Separate Wow and Flutter Control
Tape Pro treats Wow and Flutter as their own modules, not just a combined wobble knob, and the practical advantage is control where if you want subtle movement that makes a mix feel less static, you can keep flutter low and use a touch of wow. If you’re doing production moves, you can push either one into clearly audible instability without forcing extra noise or extra saturation, and that separation is also helpful on mastering chains when you want tape tone but you don’t want obvious modulation.
- Integrated Tape Delay and Sampled Noise
In the end, Tape Pro includes an analog tape delay machine emulation that behaves differently when it’s inside the same processing context as tape saturation and tape response, and you can do echo that already has the same IR based tone shaping and saturation profile as the dry signal.
The Noise module uses real sampled tape noises, and for modern mixing the key is that it’s optional and adjustable where you can use it as a glue layer for sampled material or remove it entirely when you only want tape tone and transient behavior.
8. u-he Satin
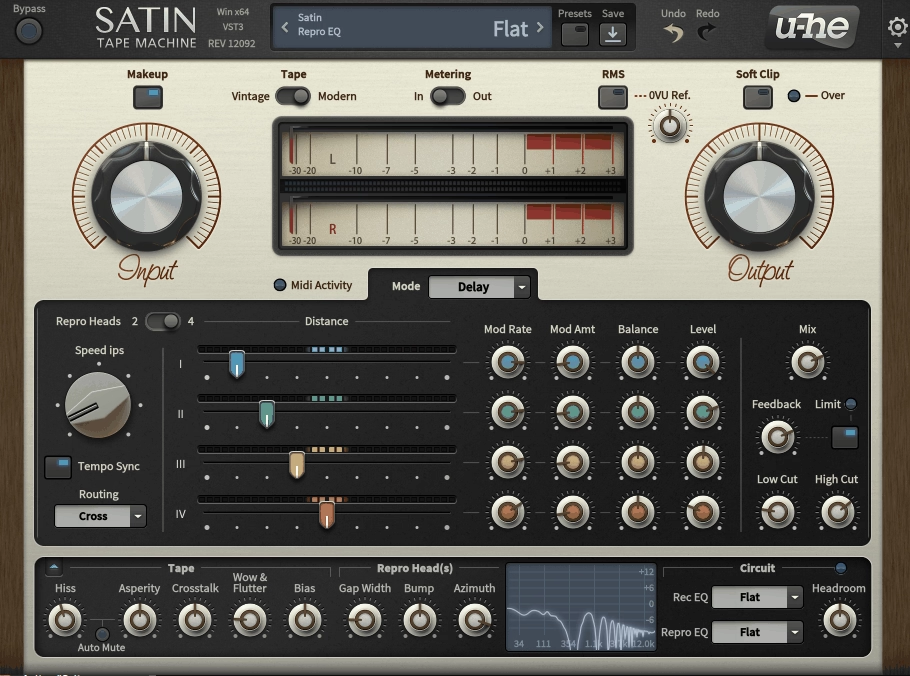
I love how it let you build the tape behavior you actually need in a mix. u-he Satin includes the stuff most tape plugins avoid where you get noise reduction encoding and decoding, independent record and repro EQ curves, and deep service tech controls that let you shape head bump, gap loss, azimuth, and bias like you’re inside the machine. It’s designed to work as either a subtle glue stage on buses and masters, or as a multitrack style system where many instances behave like one deck.
Main view is intentionally fast where you set the core tape behavior in Studio mode for standard tape emulation, then optionally switch into Delay or Flange modes for tape based time effects. The plugin is built around the idea that tape sound isn’t one parameter but a stack of small nonlinearities plus frequency shaping, noise behavior, and dynamics that add up, and Satin exposes those layers without forcing you into a one knob compromise.
- Studio Mode with Vintage vs Modern Behavior
In Studio mode, the core mixing move is pushing input to get the tape’s compression and saturation, with automatic make up gain to keep output consistent while you dial it in, and that auto level compensation is a practical feature because tape is a classic loudness trap. Satin gives you a Vintage vs Modern tape behavior switch where Vintage can get rougher sooner and feel more uneven, while Modern stays more controlled for bus work.
Tape speed is continuous and runs from 7.5 to 30 ips, and that range is meaningful where lower speeds are noisier and darker with less top end, while higher speeds trade some low end behavior for cleaner highs. I can see that Satin also includes pre emphasis to shape how the top end survives the tape process, which becomes important when you’re trying to get tape density without dulling a modern mix.
- Multitrack Grouping and Service Panel Controls
I would say, if you want the recorded to tape feeling across a whole session, it has eight groups where you can assign instances to a group so they behave like one virtual multitrack machine, and changes on one instance propagate to the others. This is how you get consistent tape behavior across drums, music buses, or full sessions without manually matching settings everywhere.
The Service panel gives you under the hood controls plus a built in analyzer so you can see the frequency response and how your tweaks are steering it. The Tape section covers hiss, asperity, wow and flutter, crosstalk, and bias where Satin separates hiss from asperity, which is level dependent tape texture that can add midrange character and a more realistic tape surface feel than static noise.
Bias is treated the right way as the control that changes the compromise between distortion behavior and high frequency response, and you get physical repro head parameters like Gap Width, Bump, and Azimuth that give you a very tape specific way to shape low end resonance and high frequency gap loss.
- Compander for Noise Reduction and Dynamic Shaping
Satin tape emulation plugin includes a selectable Compander designed to model multiple Dolby and dbx noise reduction systems and let you run encode and decode behavior. This is not just about reducing hiss but a dynamic frequency dependent behavior that can be used as an enhancer, a harshness controller, or a weird transient and brightness shaper when you intentionally mismatch encoder and decoder.
If you mix a lot of bright digital synths, aggressive samples, or harsh top end sources, this is the part of Satin that can do something you cannot get from tape saturation plus EQ where it’s a different kind of dynamic shaping that can sit in a chain as a problem solver or as a character stage.
- Delay and Flange Modes
Satin’s Delay mode offers four virtual repro heads you can adjust independently, with delay time created by tape speed and head distance like real tape delay, and you can sync to host tempo and use tape speed as a tonal control rather than a time control. The Flange mode is built around the classic two tape machine technique, including through zero flanging where the signals cross in perfect alignment, and this is why Satin’s flanging feels different from a typical LFO flanger because it behaves like two decks drifting through sync.
Freebies:
1. The Kiss of Shame
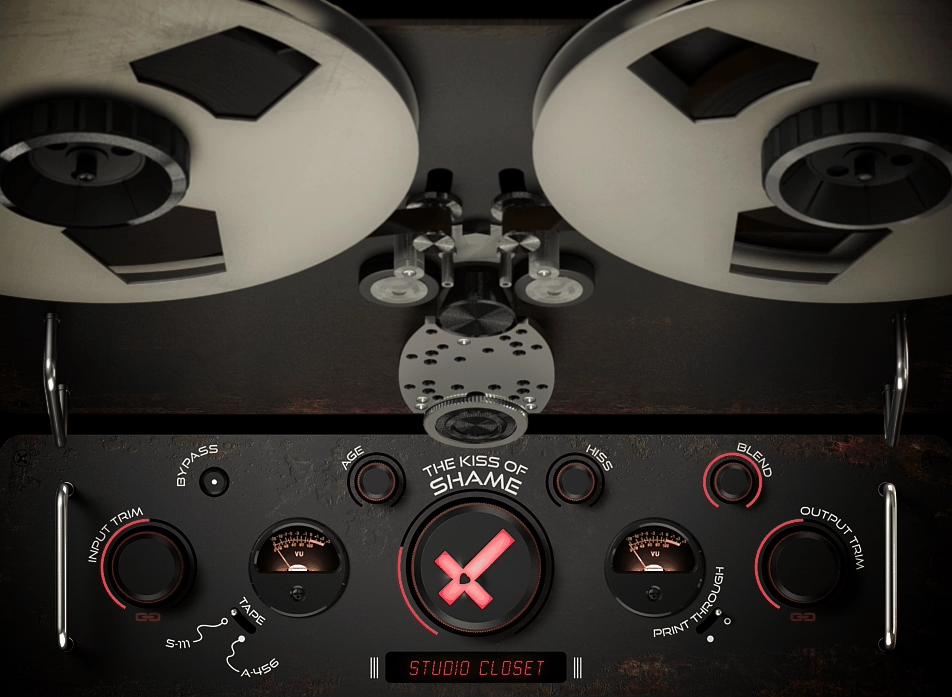
This is a revived, open source tape degradation plugin that sits closer to tape abuse as a controllable effect than polite mix bus sweetening. The Kiss of Shame started life as an unreleased project demoed around 2014, and was later brought back to working condition as part of a plugin archeology effort. The result is a very specific tool where you get a tape themed saturation and degradation processor with an interactive reel UI that you can physically touch for flange style movement, plus a few intentionally rough edges that come from its history.
I’d say, if you approach it like a modern Studer style tape model, you’ll miss the point because this plugin is built around three practical ideas where first, you add a controllable layer of harmonic coloration at the input, second, you introduce movement and instability that reads like drift, wow, flutter, and scrape flutter, and third, you make it easy to blend that entire wrecked tape path underneath a clean signal with a proper wet dry mix.
- Input Trim and Shame as Core Controls
The Input Trim is not just a level knob but adds odd and even harmonics to the input signal, and this stage is meant to be a simple, audible color move rather than an invisible preamp. I like how it’s best used like a tone shaper where you push until you get the density you want, then use the linked output trim to keep gain honest.
The big knob is Shame, and it’s essentially the macro that takes you from mild tape feels alive to clearly degraded motion where it recreates a spectrum of drift, wow, flutter, and scrape flutter. This is the knob you automate when you want a section to sag, wobble, or sound physically unstable, not something you casually sprinkle on a mastering chain.
- Environment and Age for Degradation Profile
Environment is meant to simulate storage conditions and tape damage scenarios, and Age controls how long the tape has been subjected to that environment. The reality in the current open source release is simpler where only one environment is implemented, Hurricane Sandy, modeled after tape immersed and recovered from flood waters, and this limitation tells you what you’re really getting today where you have one specific degradation profile you can push harder or softer with Age.
Hiss adds a subtle noise layer, and Blend is the wet dry mix control that makes the plugin usable in modern sessions. I think that Blend is the reason this plugin works best as a parallel color layer where you can push Shame and Age into obvious degradation, then back Blend down so the clean signal carries detail while the degraded layer provides motion and grime.
- Interactive Reels for Performance Based Flanging
The reels are not decoration where you can literally manipulate them, and this writes or performs tape flanging style movement in real time without building a two deck flange setup. The developer describes the reels as fully automatable and collapsible, with reel movement being a real parameter under the hood, and if you do transitions, risers, breakdown melts, or you like printing performance based modulation, this is the part that makes it unique.
Lastly, I would want to note that parameters are not smoothed, so you can hear zipper noise when turning knobs, and the plugin only works well at a 44100 Hz sample rate in its current form. The GitHub releases page mentions a limiter that outputs silence if a spike over +20 dB is detected, which is a serious practical detail for ear safety.
2. Caelum Audio Tape Cassette 2
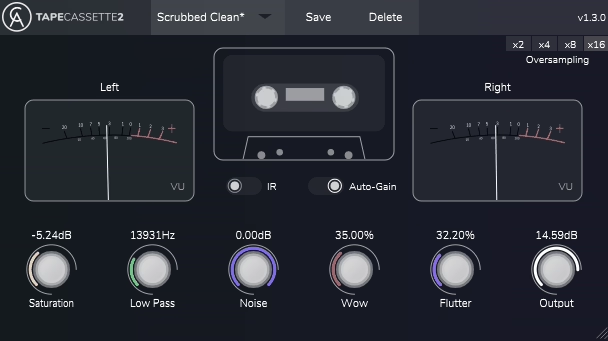
Let’s talk about another freebie designed to be fast, mixable, and believable without pretending it’s a full studio tape machine.
I can say Tape Cassette 2 focuses on the cassette behaviors you actually reach for in a mix where you get dynamic saturation with hysteresis, a Type 1 cassette impulse response for the tonal contour, wow and flutter for movement, and real sampled cassette noise when you want the medium to be audible. Caelum Audio Tape Cassette 2 is simple enough to live on lots of tracks, but the updated engine in version 2 is solid enough to use on buses when you keep it disciplined.
Here, plugin’s character comes from two layers that work together where the first is the saturation stage described as a dynamic saturation curve algorithm implementing hysteresis, and this matters because hysteresis is the tape behavior that gives you a compression-like push back and soft transient rounding that feels more like a medium than a generic drive knob. The second is the selectable Type 1 cassette impulse response, which is the quickest way to get cassette tone shaping without juggling EQs where you can run with the IR on for the full cassette contour, or switch it off if you only want the saturation behavior.
- Rebuilt Wow and Flutter Engines
In addition, it includes dedicated Wow and Flutter controls, and the wow/flutter engines were rebuilt to be smoother and more realistic than the first version. This is the section that turns it from warmth plugin into an actual cassette vibe tool because a small amount adds life to sustained material and a lot becomes an obvious creative effect, and the Noise uses real sampled noise from a Type 1 cassette with a level range that lets you keep it barely perceptible or make it part of the aesthetic.
- Low Pass Filter and Oversampling
The built-in low pass filter is one of the most practical parts of the plugin because cassette tone is as much about controlled bandwidth as it is about saturation. The low-pass range is listed as 5 kHz to 22 kHz, which gives you both subtle softening and committed lo-fi roll-off, and I like how this becomes the fastest way to shape cassette character without stacking additional processing.
Oversampling options include 2x, 4x, 8x, and 16x, which is the difference between nice crushed saturation and brittle digital fuzz when you’re driving the input hard or using it on bright material. If you’re tracking lots of instances, you can keep oversampling moderate, but if you’re printing a resample or committing a bus pass, pushing oversampling higher is the clean way to do it.
- Auto-Gain and VU Metering
On gain staging, Tape Cassette 2 includes Auto-Gain, an Output control (±24 dB), and a pair of VU meters so you can push saturation without getting tricked by loudness. The addition of the dual VU meters and selectable oversampling is part of what improved in version 2, and this makes it easy to push into obvious effect territory when you want to experiment beyond typical hardware behavior.
3. Chow Tape Model

I will close this roundup witth a Chow Tape Model by Chowdhury DSP, research driven tape machine plugin that goes far beyond the usual tape warmth story where it started as a physical model of a Sony TC 260 reel to reel, then evolved into a flexible tape system with serious controls for hysteresis saturation, bias, compression, pre and post emphasis tone shaping, wow and flutter, degradation, loss, and chew. The result is a plugin you can use for subtle cohesion, but it’s especially valuable when you want tape behavior that reacts like a system you can align and abuse, not a fixed flavor saturator.
I find most free tape plugins give you a single saturation curve and a wobble knob, but Chow Tape Model gives you a full tape path with enough control to behave like a real machine where the documentation outlines a chain that includes Input gain, Input filters, a tone block with pre emphasis, compression, the core hysteresis tape stage, then a second tone block with post emphasis, followed by additional modules like chew, degrade, wow/flutter, and loss. That gives me the tape ecosystem effect where EQ, dynamics, and saturation interact, instead of one saturation stage trying to do everything.
- Hysteresis Model with Adjustable Bias
The tape nonlinearity is based on a hysteresis model, and Bias is treated as actual tape bias behavior where lower bias widens the hysteresis curve and introduces a kind of deadzone behavior associated with under biased tape. That’s a real mixing control where under bias gets you rougher character and more obvious nonlinearity, while over bias trends smoother and more controlled, and you also get multiple hysteresis solver modes for balancing CPU cost and stability.
- Input Filtering with Makeup Control
Chow Tape Model tape emulation plugin has pre tape low cut and high cut filtering and a Makeup control that adds the filtered content back at the output, which means I can keep certain frequency regions cleaner and less affected by saturation. I like how this is a practical way to get tape thickness in the mids while keeping sub bass stable, or to tame harsh highs into the tape stage while still retaining some presence afterwards.
- Degrade, Loss, and Chew Modules
The Degrade section handles time varying deterioration where you get believable old tape behavior without resorting to static hiss layers. The Loss module simulates loss of high end and other medium limitations, which is a common mastering and mixing use when you want to soften brittle sources without blunt EQ, and Chew is the extreme effect that simulates tape being chewed by a broken machine, which becomes useful for production and sound design when you want medium failure that’s more specific than generic glitch plugins.
- Mix Group Linking and Mid Side Processing
Finally, a standout feature is Mix Group syncing where multiple instances can share settings when assigned to the same group, and this is the right way to do tape across the session without manually copying settings everywhere. It also supports Mid Side processing by encoding to M S, processing, then decoding back, which is very useful for mixing and mastering workflows where you want tape density in the mid without narrowing the sides too much.
Hello, I’m Viliam, I started this audio plugin focused blog to keep you updated on the latest trends, news and everything plugin related. I’ll put the most emphasis on the topics covering best VST, AU and AAX plugins. If you find some great plugin suggestions for us to include on our site, feel free to let me know, so I can take a look!