Doubler plugins create the illusion of multiple performances by generating slightly varied copies with controlled timing, pitch, and stereo placement differences. These are the best doubler plugins I recommend for producers and mix engineers who need professional vocal stacks, wider instruments, and dimensional depth without the time-synchronization artifacts that ruin cheap stereo wideners or the hollow phase problems that collapse in mono playback.
Doubling solves a fundamental problem in modern production: single-take recordings sound narrow and lacking presence regardless of reverb or delay tricks. Standard stereo wideners create space by phase manipulation which sounds impressive in stereo but destroys clarity in mono and creates fatigue over time.
True doubling works by simulating what happens when you record multiple performances – slight timing variations, microscopic pitch differences, tonal inconsistencies, and natural stereo placement that our ears recognize as real ensemble behavior rather than artificial processing. What separates effective doublers from basic delay-based wideners: independent control over timing variation per side so left and right copies don’t sound identical, subtle pitch modulation that creates movement without obvious detuning, tonal shaping that differentiates copies from the original source, and algorithms designed to survive mono compatibility testing.
With that being said, this guide covers doubler plugins both paid and free:
1. SoliderSound S Doubler Pro
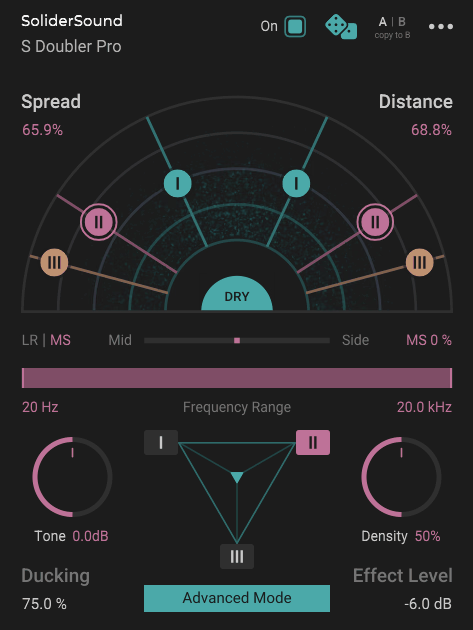
When you need to add width and depth to vocals or instruments, most doublers either give you a simple stereo spread that sounds artificial or they bury you in complex parameters that make it hard to get natural-sounding results quickly. S Doubler Pro is flexible doubling tool that adds width and depth to your tracks by leveraging psycho-acoustic proximity effects, placing six doubling voices on a virtual sound stage to breathe dimensional realism into your sound.
It handles spatial positioning and instead of just panning copies left and right, S Doubler Pro models physical proximity effects that make the doubled voices feel like they exist in actual space rather than just being spread across the stereo field. To me personally, this is the difference between doubling that sounds like an effect and doubling that sounds like multiple performers in a room.
When it comes to workflow, the plugin offers both Standard mode for quick results and Advanced mode for detailed voice sculpting, which means you can work fast when you need to or get surgical when the material demands it.
I feel like this dual-mode approach respects both the “get it done” workflow and the “perfectionist” one without forcing you to choose one permanently.
- Six Doubling Voices With Sound Stage Visualization
it generates six doubling voices that you can position using the Sound Stage Panner, which lets you adjust Spread and Distance while visualizing the voices’ positions relative to each other and the original signal.
Spread controls the overall stereo width of the doubling effect, with higher values resulting in wider panning and stronger variation between the doubler voices.
Distance controls the perceived proximity of the doubler voices, and S Doubler models a number of physical effects to simulate a realistic sense of depth. This is where the plugin separates itself from simple stereo wideners.
When you increase Distance, you’re not just making things quieter, you’re getting frequency response changes, slight level attenuation, and subtle timing variations that mimic how sound actually behaves when sources move farther away.
It can sound silly but I like how the visual feedback makes it easy to understand what’s happening spatially. You can see exactly where each voice sits in the stereo field and how far away it is, which speeds up decision-making when you’re trying to find the right balance between width and depth.
- Density and Ducking for Natural Blending
Density compresses and saturates the doubler voices, reducing their dynamic range. Higher settings create denser voices with less dynamic variation, which can be useful when you want the doubled voices to feel more consistent and present. I’ve found this especially effective on vocals where you want the doubling to provide constant width rather than ducking in and out with the performance dynamics.
Ducking controls the amount of transient-based ducking applied to the doubler voices, which means the doubled voices automatically reduce in level when transients from the original signal appear.
This is crucial for keeping the original performance clear and upfront while still getting the width and depth from the doubling. For instance, when you are doubling lead vocals, you can use Ducking to make sure the main vocal stays defined and punchy while the doubled voices fill in around it without fighting for attention.
- Frequency Range and Tone Shaping
Frequency Range limits the doubling effect to the desired frequency range, letting you focus the stereo widening effect on just part of the track. This becomes essential when you want to double high frequencies for air and width without making the low end unfocused or when you want to add body in the mids without widening the entire signal.
Tone controls a tilt EQ applied to the doubler voices and allows you to shape their character. In addition, this gives you fast tonal control without needing a separate EQ.
You can make the doubled voices brighter to add shimmer, or darker to add warmth and body, depending on what the source needs. This integrated tone control is what keeps S Doubler Pro fast to use because you’re not constantly switching between plugins to balance the doubled voices tonally.
- Voice Mixer and Advanced Mode Control
Voice Mixer balances the levels of the three voice pairs (six voices total). In Advanced Mode, it lets you select which voice pair to edit via numbered buttons, giving you independent control over each pair’s settings. With that said, you can have one pair doing wide stereo doubling, another pair doing subtle depth reinforcement, and a third one doing something more creative, all within the same instance.
2. Waves Abbey Road Reel ADT
![]()
Waves Abbey Road Reel ADT is a doubler plugin recreates the tape-based automatic double-tracking system invented by Abbey Road engineer Ken Townsend in the 1960s, using two tape machines to create delayed, pitch-modulated copies of vocals and instruments.
This isn’t a generic digital delay doubler. It’s a detailed emulation of the specific workflow, sonic coloration, and mechanical behavior of the original hardware setup that gave The Beatles their psychedelic vocal sound and created classic flanging and phasing effects on tracks like “Tomorrow Never Knows” and “Lucy In The Sky With Diamonds.”
I think what makes Reel ADT valuable is that it captures the organic imperfections of the original process. You’re getting tape machine wow and flutter, valve coloration, and varispeed modulation that behaves like actual tape, not just clean digital delay with an LFO.
When it comes to vocal doubling, this plugin delivers the warm, slightly unstable character that modern doublers can’t quite replicate because they’re too clean and precise.
- Varispeed Control for Delay and Pitch Modulation
The core of Reel ADT is the varispeed control, which adjusts the timing offset between the source and the ADT head. The offset can vary up to ±20 ms with the varispeed sweep range having the same range.
For vocal doubling, the ADT is usually delayed by around 10 to 20 milliseconds, whereas phasing and flanging have the delay modulated so the ADT signal continually moves from being behind the source signal to being in front and vice versa.
Varispeed can be set manually via the large central knob (and automated), or driven from a choice of waveforms including sine, triangular, reverse sine, reverse triangular, or random.
I’ve found that random sounds the most realistic for doubling because it mimics the natural pitch and timing inconsistencies of a real second performance. Manual operation and LFO modulation can be used simultaneously, and the LFO can be sync’d to your DAW’s tempo for rhythmic phasing effects.
- Tape Drive and Valve Coloration
Reel ADT emulates the wow and flutter and sonic coloration of the two valve tape machines used in the original setup. Source drive controls are available for both inputs, letting you overdrive either tape machine in the same way as the originals.
Turning up the tape drive adds a tape-like fatness to the sound until you push too far, at which point things get more distorted. This saturation is what gives Reel ADT its vintage character compared to clean digital doublers.
- Dual-Voice Mode for Complex Doubling
A two-voice option can be used in stereo or mono, adding a second speed-modulated signal that can be modulated independently of the first. When you select the dual-voice version, you get two ADT sections and an extra ADT head shown in the display.
I like how this lets you create more complex doubling by having different delay times or positive and negative delay times on the two channels, which sounds extremely authentic when set up with gentle random modulation in the 10 to 15 ms area with a range of three or four milliseconds.
- Polarity Invert and Panning for Phasing Effects
Source and ADT components can be panned individually and adjusted in level, with polarity-invert buttons available for both inputs.
In fact, Abbey Road’s engineers used different terminology for phasing and flanging. Flanging is the “through zero” effect heard when both signals are of the same polarity, and phasing is the same thing but with one signal’s polarity inverted. The resulting comb filtering stresses different frequencies in both cases, with the inverted option giving a much deeper null as the delay time passes through zero.
- MIDI Control and Latch/Touch Modes
The varispeed control can be assigned to MIDI in DAWs that permit sending MIDI to processing plugins, which opens up performance possibilities. A Latch mode forces the varispeed control to stay on the value it was when released, while Touch mode forces the varispeed control back to zero when released.
These modes become useful when you’re automating dramatic phasing sweeps or when you want the effect to return to a neutral doubling position automatically.
- Practical Application for Doubling and Effects
As a vocal or instrument doubler, Reel ADT is capable of excellent results, especially in dual-voice mode. Set up so that the delay time wanders gently in the 10 to 15 ms area using the random waveform with a range of three or four milliseconds, and you get extremely authentic doubling.
For phasing and flanging, the sound is more Beatles-era psychedelia than extreme modern flanging.
The tempo-locked modulation options also work well on drum grooves and loops with rhythmic phasing that appeals to both dance and ambient music. I’d say if you want that John Lennon trippy vocal sound or classic Abbey Road doubling character, Reel ADT is the most authentic way to get it.
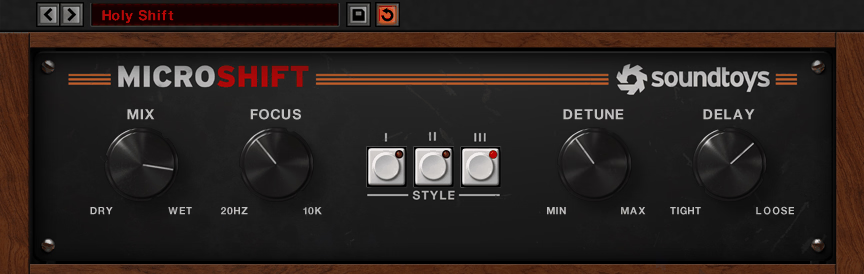
3. SoundToys MicroShift
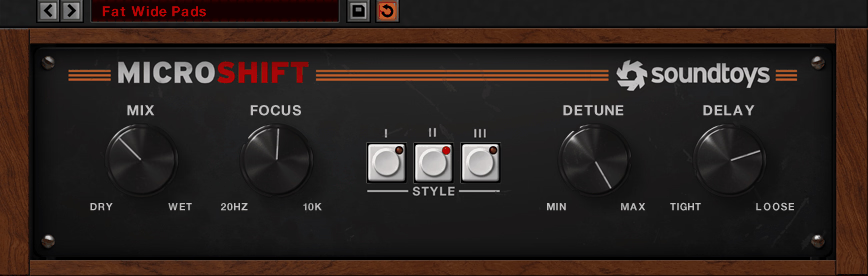
I think what separates this one from other widening plugins is how it handles the analog saturation characteristics of the original hardware units behind the scenes. SoundToys MicroShift emulates algorithms from the Eventide H3000 Harmonizer and AMS DMX 15-80, but instead of requiring complex setup, it boils everything down to three rotary controls and a style selector that makes it nearly impossible to get a bad sound.
You’re not just getting clean digital delay and pitch-shifting, you’re getting the warmth and slight imperfections that made those hardware units sound musical rather than sterile. In my opinion, this is why MicroShift works on so many sources, from obvious applications like vocals and guitars to more creative uses on synth basses and drum rooms.
- Three Styles Based on Classic Hardware
MicroShift provides three styles of widening. Two are based around algorithms from the original Eventide H3000 Harmonizer, while the third emulates the AMS DMX 15-80. Each style has a different character, and I’ve found that switching between them often reveals which one works best for a particular source faster than trying to dial in settings manually.
The H3000-based styles tend to sound more smooth and polished, while the AMS emulation has a slightly grittier, more textured quality that works beautifully on guitars and synths.
- Detune and Delay Controls for Character
Single rotary controls govern the wet/dry mix and the amount of detuning and delay applied. Short delays and low detune settings produce subtle widening effects that are nevertheless very effective, while more extreme settings can generate superb chorus-style textures.
When it comes to vocal doubling, I would typically keep the detune modest and the delay in the 10-15 ms range for natural thickness. For more obvious widening on pads or backing vocals, I push both parameters higher to get that classic ’80s shimmer.
- Focus Control for Frequency-Specific Processing
A dial labeled Focus adds the ability to apply the effect only to frequencies above a user-defined cutoff point. This becomes quite useful because you can explode a synth bass across the entire stereo field without affecting its low-end impact, or add width to vocals and guitars while reducing muddiness in the low-mids.
For instance, when you are working with synth basses, you can set Focus around 200-300 Hz so the sub stays tight and centered while the harmonics spread wide, which gives you width without losing punch.
I like how this one control dramatically extends the usefulness of the plugin. By setting Focus somewhere in the mid-range, you get the best of both worlds: focused low-end and wide, exciting highs. This is especially effective on drum overheads where you want stereo width in the cymbals without making the kick and snare feel diffuse.
- Practical Application for Widening
MicroShift doubler plugin can do the obvious ’80s Phil Collins vocal sounds and hair-metal guitar solos, but there’s much more to it than that. You can actually use half a dozen instances on different instruments in a mix because it works so well on vocals, guitars, synths, pads, and even drum rooms. The plugin is deceptively simple yet extremely effective, making it one of those tools that stays inserted on multiple channels rather than being a specialty effect you pull out occasionally!
4. Sonnox VoxDoubler
Traditional delay-and-detune doublers create an artificial sound because they use static pitch shifting and fixed timing offsets that don’t change with the performance. The problem gets worse when you need the effect to sound natural rather than obviously processed, which is exactly when most doublers fail.
VoxDoubler by Sonnox is built around advanced analysis of pitch, amplitude, duration, and timbre to create doubled voices that vary dynamically rather than staying locked to a single delay and detune amount, which is why it sounds more like actual multi-tracking than typical ADT plugins.
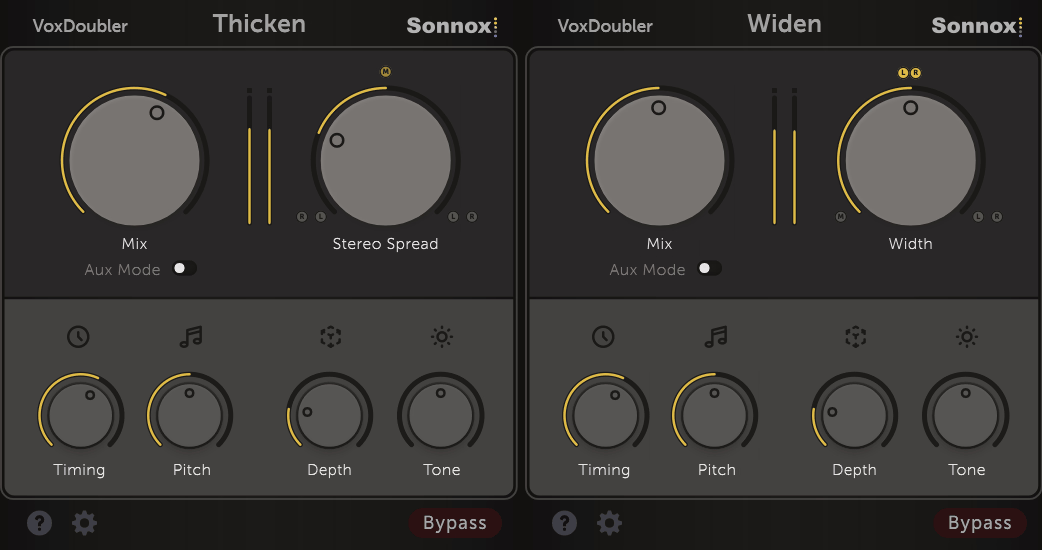
This doubler comes with two plugins in one package: Widen and Thicken. Each handles doubling differently, and having both gives you options for different sources and different mixing goals without needing separate products. When it comes to simplicity, both plugins use the same six-knob control layout, which is refreshing compared to Sonnox’s typically parameter-heavy effects.
- Widen for Triple-Tracked Width
Widen generates two new mono voices and pans them to the left and right of the original vocal to create a triple-tracked effect. The right-hand control adjusts the width of the two added mono voices between mono and hard-panned L/R, giving you precise control over how expansive the doubling feels.
I’ve found that Widen has a more spacious character presumably due to it adding two voices rather than one, with a more obvious doubling element that works nicely on lead vocals that need to feel bigger without getting buried in reverb.
- Thicken for Stereo Density
Thicken generates a single stereo second voice and adds it to the original vocal to produce the effect of two singers working into a stereo pair of mics. The Width control adjusts the degree of stereo spread of the added voice, with mono in the center position and the left signal changing places with the right when the knob is to the left of center.
In my opinion, Thicken really does add a sense of thickness without over-emphasizing the doubling aspect, making it perfect for situations where you want fullness but don’t want the doubling to be front and center.
- Humanize Section for Natural Variation
The smaller knobs in the Humanize section control the extent to which the timing and pitch of the doubled voices varies from the original. This is crucial because static pitch and timing is what makes most doublers sound artificial. The Pitch control works best in the first half of its travel for natural sound, while pushing it further creates more obvious variation.
Depth makes the added voices less prominent by delaying and softening them, which is helpful in moderating the artificial doubling of transients that most ADT methods suffer from. I like how Depth lets you keep the doubling present but pushes it back spatially so it doesn’t compete with the original performance for attention.
- Tone Control for Sibilance and Presence
Tone is a high cut/boost control that can be used either to soften sibilants in the doubled voices, or as a high boost to add presence. This becomes essential when doubling sources with harsh high frequencies, because you can keep the doubled voices smooth and supportive rather than adding extra edge.
For example, when you’re doubling bright vocals, you can cut the Tone slightly on the doubled voices to keep them from adding harshness while still providing body and width.
- Practical Application for Vocals and Instruments
I’ve found both plugins work exceptionally well on electric guitar, where they add width and thickness without the phasing artifacts that simple stereo spread creates. The main difference is that Widen feels more expansive while Thicken feels more cohesive, so the choice depends on whether you need obvious width or subtle density.
5. Antares Duo
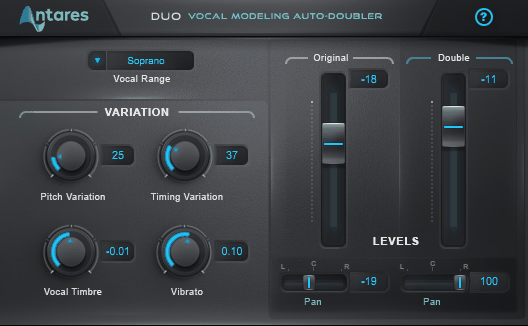
Antares Duo generates a realistic doubled vocal part automatically from a single existing vocal track using programmable variation in pitch, timing, and vibrato depth, then lets you control the timbre, level, and pan of both the original and doubled voices independently to craft exactly the stereo mix you need.
This isn’t just a delay-and-detune doubler. It includes adjustable vocal timbre modeling that can make the doubled part sound like the same person as the lead vocalist, or like someone else entirely, which opens up possibilities beyond basic doubling into backing vocal territory.
- Timbre Modeling for Realistic or Creative Doubles
The timbre modeling is what separates Duo from basic doublers. You can adjust the vocal character of the doubled voice to match the lead exactly for natural double-tracking, or shift it toward a more masculine or feminine voice for creative layering that sounds like a different singer. I think this becomes especially powerful on backing vocals where you want the doubled voice to sit slightly different in the mix without sounding like an obvious effect.
- Pitch, Timing, and Vibrato Variation
Duo doubler VST plugin lets you control pitch variation, timing variation, and vibrato depth independently, which is how it avoids the static, artificial sound of simple delay-based doublers. The pitch and timing elements aren’t fixed, so the doubled voice moves dynamically relative to the original, creating the illusion of an actual second performance rather than a processed copy.
I’ve found that moderate settings on all three parameters deliver the most natural results, while pushing them creates more obvious doubling for choruses or dramatic sections.
- Independent Level and Pan Control
You get independent control of the level and pan of the original and doubled voices, letting you craft the perfect stereo mix without needing separate tracks or complicated routing. For instance, you can keep the original vocal centered and pan the doubled voice hard left or right for width, or blend them together in the center with the doubled voice slightly quieter for thickness without obvious stereo spread.
- Simple Interface for Fast Results
The plugin features a simple, intuitive layout that makes it fast to dial in results. You’re not fighting dozens of parameters or complex menus. Just adjust the variation parameters and output controls to create the doubling effect you’re looking for, which means you spend more time mixing and less time reading manuals. At first glance, this simplicity might seem limiting, but in practice it’s exactly what you need when you just want natural-sounding doubles quickly.
- Practical Application for Vocals and Beyond
While Duo is designed for vocals, it works well on other sources too. I like using it on electric guitars and synths where you want width and depth without the phasing artifacts of simple stereo spread.
The combination of realistic doubling, timbre control, and independent mixing makes it versatile enough for lead vocals that need subtle thickening, backing vocals that need obvious presence, or creative applications where you want the doubled voice to sound distinctly different from the source.
6. Softube Fix Flanger and Double
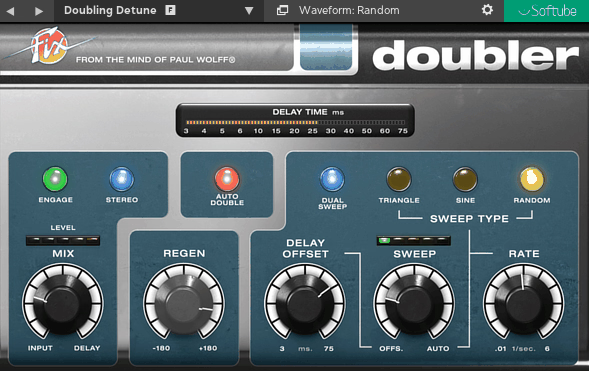
Classic flanger and doubler effects are often separate plugins with different workflows, which means you’re buying and learning two different interfaces even though both effects share the same basic concept of delayed and modulated signal blending. Fix Flanger and Doubler packages both into a two-plugin bundle designed in collaboration with audio veteran Paul Wolff, based on his prototype hardware designs from the 1970s including the Real Time Auto Doubler AD-2, giving you focused workflows for both flanging and doubling without redundant controls.
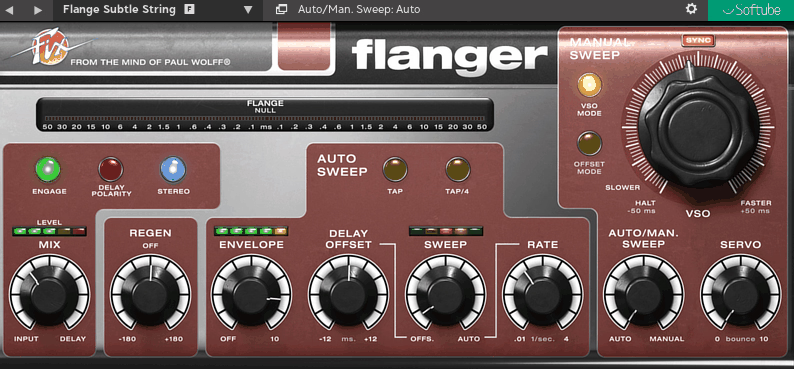
- Fix Flanger for VSO Tape-Style Control
Fix Flanger is the more complex of the two, featuring both Auto (LFO) and Manual Sweep controls with the option to blend the two. The Auto Sweep settings include LFO Rate, Delay Offset (sweep start point), and Sweep (the blend of Auto Sweep and Delay Offset).
These are supplemented by a one-knob Envelope follower that makes the flange react dynamically to input level, plus two Tap buttons where one sets the LFO rate and the other divides it by four for slower sweeps.
The Manual Sweep section can be switched between regular Offset mode and the tape machine-emulating VSO mode. For both manual modes, the Servo parameter introduces a degree of inertia or “bounce” as you change delay settings, which emulates the physical response of a tape machine’s varispeed motor. I think this VSO mode with servo bounce is what gives Fix Flanger its unique character compared to typical digital flangers that respond instantly to parameter changes.
- Fix Doubler for Chorus and Widening
Fix Doubler plugin has controls for manual Delay Offset, modulation Rate, Sweep Type (waveform), Sweep amount, and Delay Regen (feedback). The interface is more streamlined than Fix Flanger because it’s focused specifically on doubling and chorus effects rather than extreme modulation.
For richer effects, Dual Sweep mode switches to two hard-panned doublers out of phase with each other, which creates wide stereo doubling that can even facilitate auto-panning when pushed. Auto Double mode disables the manual Regen and delivers what can best be described as a thicker, more smeared effect.
- Envelope Following and Tap Tempo
Fix Flanger’s Envelope follower is particularly good on drums, where it makes the flange depth react to hit intensity rather than staying static.
The Tap tempo feature assists quick setup by letting you tap in the sweep rate rather than dialing it in manually, which is faster when you’re trying to sync flanging to a track’s groove. I like how these features make Fix Flanger feel more performance-oriented rather than just being a set-and-forget effect.
- Practical Application for Doubling and Modulation
The switchable delay Polarity in Fix Flanger changes the character of the comb filtering, giving you two distinct flavors of flanging from the same settings. Fix Doubler’s Dual Sweep mode makes it excellent for backing vocals where you want obvious width without the pitch shifting artifacts of simple stereo spread. I’d say small parameter changes, particularly in delay timing, can heavily influence the end result with both plugins, so it’s worth spending time fine-tuning rather than just loading presets.
Freebies:
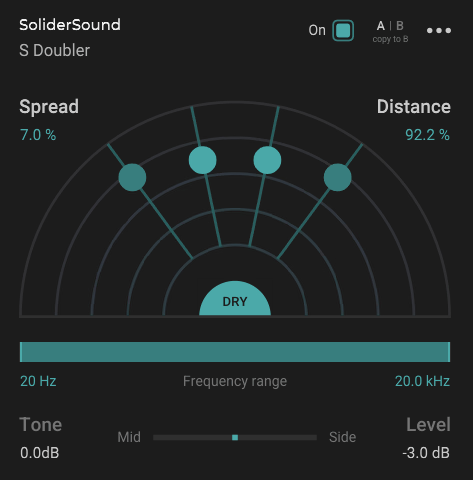
1. SoliderSound S Doubler
Most free doublers give you basic stereo spread but don’t simulate the actual psycho-acoustic cues that make real doubled performances sound natural and dimensional.
S Doubler by SoliderSound is a completely free doubler that replicates the psycho-acoustic effects of sound proximity to create a true sense of dimension by placing four doubling voices on a virtual sound stage rather than just panning copies left and right.
- Spread and Distance for Dimensional Control
Spread controls the overall stereo width of the doubling effect, with higher values resulting in wider panning and stronger variation between the doubler voices. Distance controls the perceived proximity of the doubler voices by modeling a number of physical effects to simulate a realistic sense of depth.
This is what separates S Doubler from simple stereo wideners because you’re getting frequency response changes, level attenuation, and timing variations that mimic how sound actually behaves when sources move farther away.
- Mid/Side Processing and Practical Features
- Tone and Frequency Range for Targeted Processing
Tone controls a tilt EQ applied to the doubler voices, letting you shape their character without needing a separate EQ. Frequency Range limits the doubling effect to the desired frequency range, so you can focus the stereo widening on just part of the track.
For instance, you can double high frequencies for air and width without making the low end unfocused, or add body in the mids without widening the entire signal.
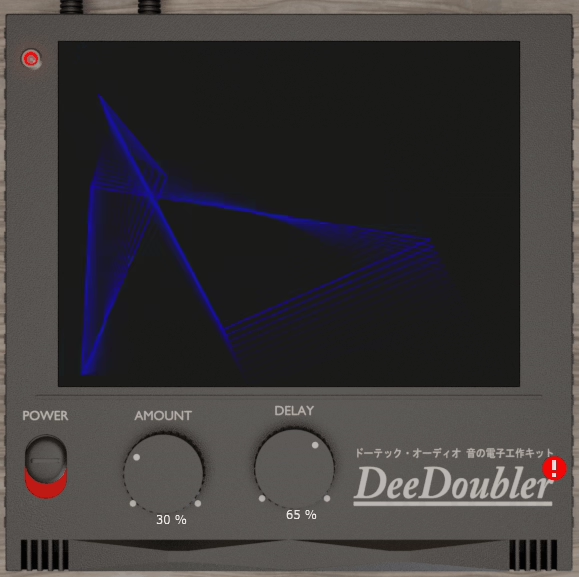
2. Dotec-Audio DeeDoubler
Free vocal doublers are everywhere, but most either sound obviously artificial or require you to tweak a dozen parameters just to get usable results, which defeats the purpose of having a “simple” effect when you need to read a manual to understand what half the controls actually do.
DeeDoubler by Dotec-Audio adds depth to vocals by layering voices using classic mixing techniques with filters and phase adjustment.
- Two-Knob Simplicity
The operation is intentionally minimal with AMOUNT to adjust the intensity of the doubling and DELAY to adjust the width of the doubling. That’s it.
No complicated routing, no excessive parameters, just straightforward control over how much doubling you want and how wide it spreads. I think this simplicity is what makes DeeDoubler practical.
AMOUNT controls how present the doubled voice is in the mix. Lower settings give you subtle thickening that adds body without obvious doubling. Higher settings create more obvious layered vocals that work well on choruses or backing vocals. DELAY controls the stereo width of the doubled voices.
Smaller delay values keep the doubling more centered and focused, while larger values push the doubled voices wider for more expansive stereo spread. When it comes to lead vocals, I would say keep DELAY moderate to avoid the doubling feeling too detached from the original.
- Classic Studio Technique
DeeDoubler reproduces the mixing technique using filters and phase adjustment that has been done for decades in professional studios, which is why it features a clean and classic effect rather than sounding like modern digital processing.
I’ve found the doubling sits naturally in the mix without the metallic or artificial character that many free doublers suffer from. The plugin works on main vocals, chorus, and rap, and it’s completely free with no limitations in VST2/VST3/AU/AAX formats.
3. iZotope Vocal Doubler
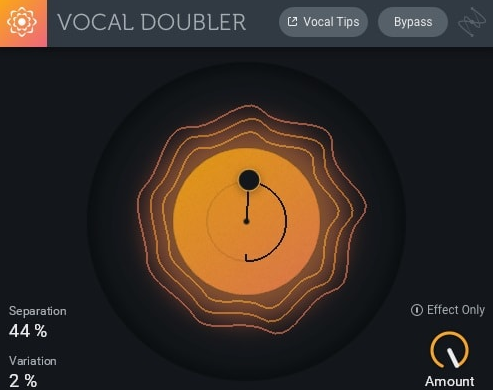
iZotope Vocal Doubler is designed to enhance vocals with a natural doubling effect, adding richness and depth using the company’s acclaimed doubling technology reimagined with an interactive UI dedicated to helping you achieve a great double faster than ever.
The interface features minimal parameter controls where you simply drag up and down for stereo separation or left and right for human variation, which makes it one of the most intuitive doublers available.
- Two-Dimensional Control Interface
The plugin’s unique control scheme lets you adjust both stereo width (vertical movement) and human variation (horizontal movement) in a single gesture. Dragging up creates wider stereo separation by panning the doubled voices further apart, while dragging down keeps them more centered.
Dragging left and right adjusts the amount of variation in timing and pitch between the doubled voice and the original, with more variation creating a more obvious doubled effect. I think this two-dimensional approach is brilliant because you’re adjusting the two most important parameters simultaneously rather than tweaking separate knobs.
- Low on CPU
- Beyond Vocals
While designed for vocals, Vocal Doubler works well on other sources too. I’ would use it on guitars, synths, and keys where you want quick thickness without complicated setup.
- Practical Application
This doubler plugin excels at creating the illusion of multiple performances without the phase issues or artificial sound of simple delay-based doublers.
For lead vocals, subtle settings add body and presence without making the doubling obvious. For backing vocals, more aggressive settings create the impression of multiple singers from a single take. In the end, I’d say the combination of being completely free, low on CPU, and incredibly simple to use makes Vocal Doubler an essential tool for producers.
Hello, I’m Viliam, I started this audio plugin focused blog to keep you updated on the latest trends, news and everything plugin related. I’ll put the most emphasis on the topics covering best VST, AU and AAX plugins. If you find some great plugin suggestions for us to include on our site, feel free to let me know, so I can take a look!